- Published on
Modular Monolith - Implementation Deep Dive
10 min read- Authors

- Name
- Daniel Mackay
- @daniel_mackay

- Introduction
- Project Structure
- Host
- Modules
- Features
- REPR Pattern
- Domain
- Common (Shared Kernel)
- Conclusion
- Resources
Series
This post is part of a Modular Monolith series, in which we'll dive into the many facets associated with the architecture.
- Part 1: Modular Monoliths - A Gentle Introduction
- Part 2: Modular Monoliths - Implementation Deep Dive
- Part 3: Modular Monoliths - Simplifying the Inner Dev Loop with .NET Aspire
- Part 4: Coming Soon
Introduction
In the previous post, we discussed the concept of a Modular Monolith Architecture (MMA) and how it compares to other architectural styles. In this post, we will dive deeper into the implementation details of a modular monolith.
Overview
In this post we will be building out the major pieces of an MMA application.
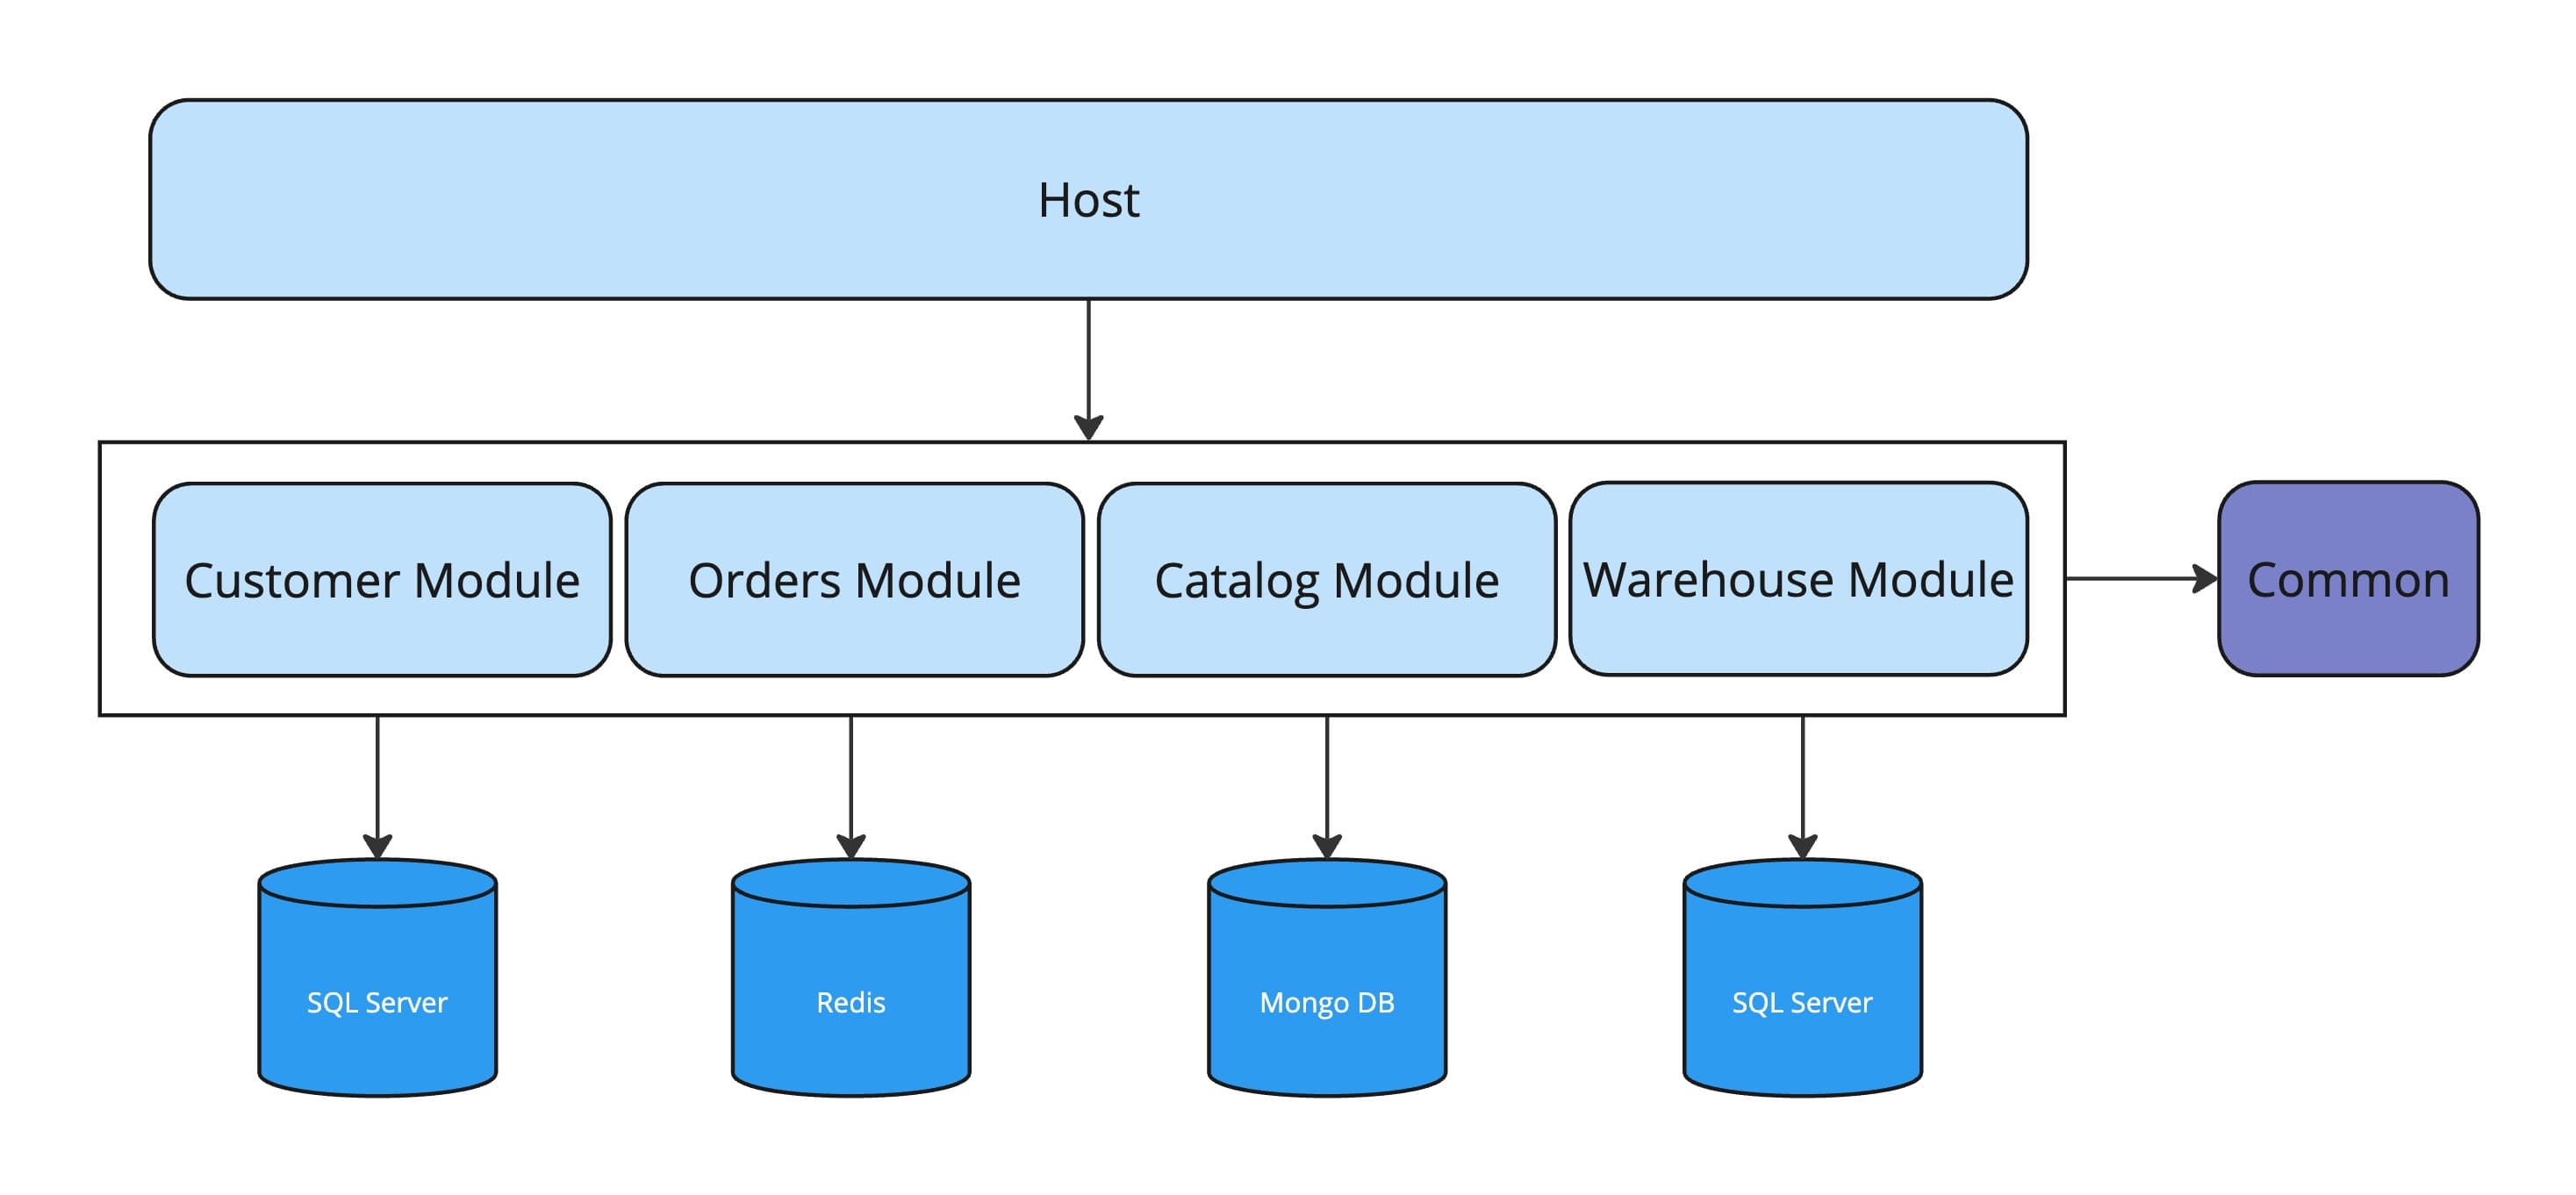
NOTE: In my sample below, I've used a SQL Server database for each module. However, each module is free to use the most appropriate database as shown in the diagram above.
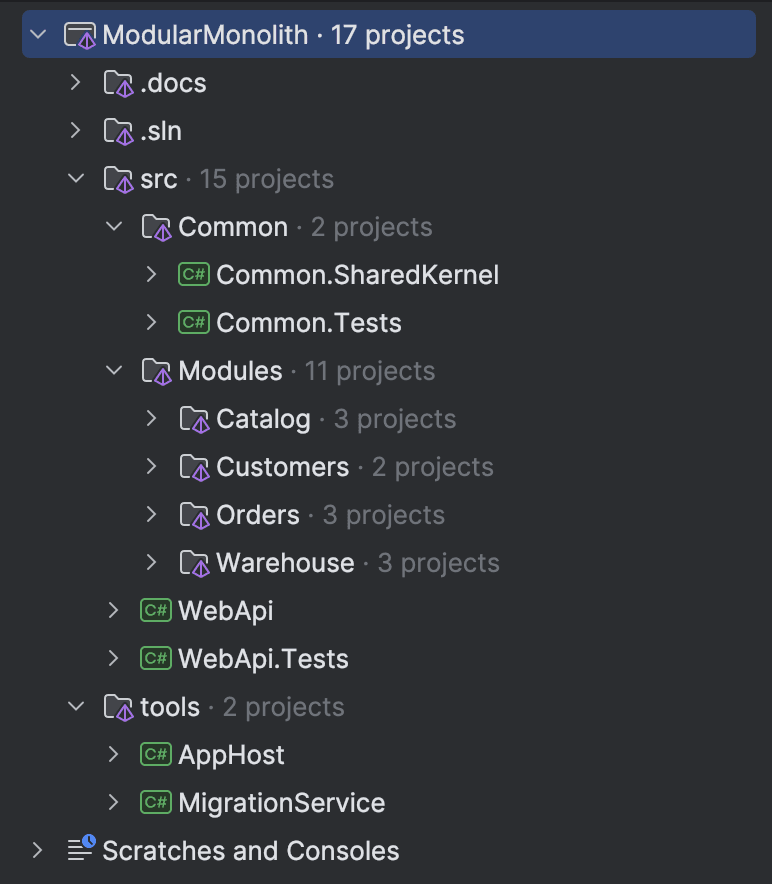
Project Structure
The structure above looks like the following from a solution point of view:
Host
Let's start with the Host. This is the entry point or gateway into our application. It is responsible for bootstrapping the application, setting up the DI container, and configuring the application. The Host is the only project that references all other projects in the solution.
As a general rule, the host should contain no business logic. It should be as thin as possible and only contain code that is necessary to bootstrap the application. Specific configuration needed by each module should be configured in the module itself.
The host project is very similar to a regular Web API project and wires up the following:
- Swagger UI
- Global Error Handling
- MediatR
- Aspire Service Defaults
- Common dependencies (Shared Kernel)
using Common.SharedKernel;
using Modules.Catalog;
using Modules.Customers;
using Modules.Orders;
using Modules.Warehouse;
using WebApi.Extensions;

var builder = WebApplication.CreateBuilder(args);
{
    // Add service defaults & Aspire components.
    builder.AddServiceDefaults();

    builder.Services.AddSwagger();

    builder.Services.AddHttpLogging();

    builder.Services.AddGlobalErrorHandler();

    builder.Services.AddCommon();

    builder.Services.AddMediatR();

    // Register services module
    builder.AddWarehouse();
    builder.AddCatalog();
    builder.AddCustomers();
    builder.AddOrders();
}

var app = builder.Build();
{
    // Configure the HTTP request pipeline.
    if (app.Environment.IsDevelopment())
    {
        app.UseSwagger();
        app.UseSwaggerUI();
    }

    app.UseHttpsRedirection();

    // Register middleware / routes for each module
    app.UseOrders();
    app.UseWarehouse();
    app.UseCatalog();
    app.UseCustomers();

    app.MapDefaultEndpoints();

    app.Run();
}
Each module is wired up in two different ways. Once to register services and dependencies. Another time to wire up middleware and routes.
Modules
Now onto the modules themselves. A typical module will look as follows:
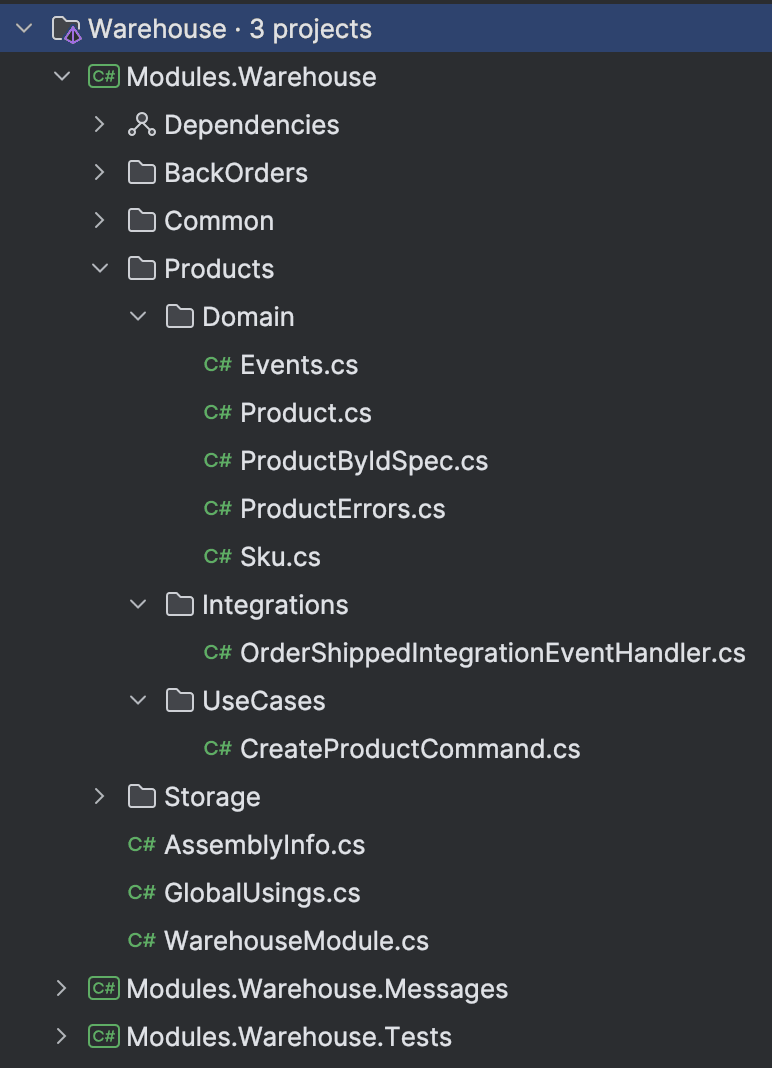
From a project point of view we have the following:
- Module: Module registration and feature implementation
- Messages: API for inter-module communication
- Tests: Contains both unit and integration tests
At the root of the module you will find a class responsible for registering everything the module needs. In our Warehouse module this is the WarehouseModule class, that we saw used in progam.cs.
public static class WarehouseModule
{
    private static readonly Assembly _module = typeof(WarehouseModule).Assembly;

    public static void AddWarehouse(this IHostApplicationBuilder builder)
    {
        builder.Services.AddHttpContextAccessor();

        builder.Services.AddValidatorsFromAssembly(_module);

        builder.AddPersistence();

        builder.Services.AddScoped<ISupplierService, FakeSupplierService>();
    }

    public static void UseWarehouse(this WebApplication app)
    {
        app.UseInfrastructureMiddleware();
        app.DiscoverEndpoints(_module);
    }
}
What goes in this class depends on what the module needs to do. Some examples responsibilities are:
- Dependency registration
- Endpoint registration
- Middleware registration
- Wiring up Persistence and other Infrastructure concerns
- Wiring up Fluent Validation
In the code above app.DiscoverEndpoints() is a custom function I've written that uses reflection to automatically discover and register all endpoints in a module.
The rest of the module can be categoried as either a feature or common. Common code should be kept to a minimum and should be used sparingly. Typically, this contains persistence code (such as EF Core), but does not contain the domain entities themselves.
Features
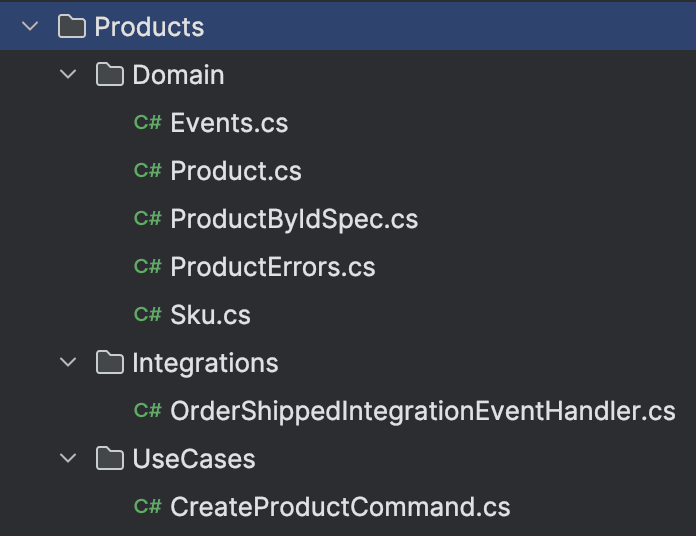
As we dive deeper, features are the heart of a module, and where you'll be spending most of your time. When using a Domain-Driven Design approach as I'm doing here, features map very nicely to aggregates. When mapping out the warehouse domain, I determined I would need 3 aggregates: Products, BackOrders and Storage and I created a feature for each of these.
When building a Modular Monolith, each module has the freedom to structure it's code in whatever way makes the most sense for the functionality. Two main choices here are Vertical Style Architecture (VSA) and Clean Architecture (CA). While I love CA, the amount of projects needed (typically ~4) can cause the number of projects in a Modular Monolith to explode. Furthermore, the mindset between a CA and a VSA is very different. CA focuses on grouping code by technical concern, whereas VSA focuses on grouping code by feature. VSA and Modular Monoliths follow similar principles, once is grouping code by features, the other provides an additional grouping of those features into modules. Seeing as the principles are very similar, and the resulting code is simpler, I believe VSA compliments Modular Monoliths.
Another benefit of using VSA and a single project is that we can provide better encapsulation for our module. By defaulting to marking classes as internal we can be very specific about what we want to expose (which isn't much). This helps to keep our modules decoupled and easier to maintain.
REPR Pattern
For each Use Case (e.g. a command or query), I've decided to use the Request-Endpoint-Response (REPR) pattern. When using this approach all code needed for a single Use Case (excluding the Domain) is located in the same file. I find this structure very productive as nearly all code needed for a feature is in one file.
For the implementation, I've chosen to use a static class and several nested classes that each have their own responsibility.
public static class CreateProductCommand
{
    public record Request(string Name, string Sku) : IRequest<ErrorOr<Response>>;

    public record Response(Guid ProductId);

    public class Endpoint : IEndpoint
    {
        public void MapEndpoint(IEndpointRouteBuilder app)
        {
            app.MapPost("/api/products", async (Request request, ISender sender) =>
                {
                    var response = await sender.Send(request);
                    return response.Match(TypedResults.Ok, ErrorOrExt.Problem);
                })
                .WithName("Create Product")
                .WithTags("Warehouse")
                .ProducesPost()
                .WithOpenApi();
        }
    }

    public class Validator : AbstractValidator<Request>
    {
        public Validator()
        {
            RuleFor(r => r.Name).NotEmpty();
            RuleFor(r => r.Sku)
                .NotEmpty()
                .Length(Sku.DefaultLength);
        }
    }

    internal class Handler : IRequestHandler<Request, ErrorOr<Response>>
    {
        private readonly WarehouseDbContext _dbContext;

        public Handler(WarehouseDbContext dbContext)
        {
            _dbContext = dbContext;
        }

        public async Task<ErrorOr<Response>> Handle(Request request, CancellationToken cancellationToken)
        {
            var sku = Sku.Create(request.Sku);

            var product = Product.Create(request.Name, sku);
            _dbContext.Products.Add(product);
            await _dbContext.SaveChangesAsync(cancellationToken);

            return new Response(product.Id.Value);
        }
    }
}
In the CreateProductCommand Use Case we have the following:
- Request: This defines the Use Case input
- Response: This defines the Use Case output
- Endpoint: Controls routing, mapping errors, and API documentation
- Validator: Basic input level validation
- Handler: Implementation of the Use Case
NOTE: As an added benefit, this makes it SUPER easy to add new features. Simply copy and paste a UseCase, change the top class name and start implementing
Our Handler is returning a ErrorOr<Response>. This leverages the ErrorOr library to implement the Result pattern. I much prefer this over throwing exceptions that we expect to magically get handled at a higher level. The Handler returns a class that is very specific about if the function succeeded or not. This also allows us to very cleanly provide a success or failure response from the API via:
response.Match(TypedResults.Ok, ErrorOrExt.Problem);
On success, the value is passed to TypedResults.Ok() and on failure, the error is passed into ErrorOrExt.Problem() to map the error into a HTTP status code. Everything works as expected without the use of exceptions for flow control. Fantastic. 😎
Domain
The last part of the module is the Domain. As mentioned earlier, Aggregates map very nicely to features. Following this it makes sense to keep the Domain in the root of the feature, close to the Use Cases that depend on it. Our Domain model is free of any Infrastructure concerns such as EF Core configuration. It is a pure POCO that contains business logic, business validation, and is trivial to unit test.
For example, the Product Aggregate looks like:
internal class Product : AggregateRoot<ProductId>
{
    private const int LowStockThreshold = 5;

    public string Name { get; private set; } = null!;

    public Sku Sku { get; private set; } = null!;

    public int StockOnHand { get; private set; }

    private Product()
    {
    }

    // NOTE: Need to use a factory, as EF does not let owned entities (i.e. Money & Sku) be passed via the constructor
    public static Product Create(string name, Sku sku)
    {
        ThrowIfNullOrWhiteSpace(name);

        var product = new Product
        {
            Id = new ProductId(),
            StockOnHand = 0
        };

        product.UpdateName(name);
        product.UpdateSku(sku);

        product.AddDomainEvent(new ProductCreatedEvent(product));

        return product;
    }

    private void UpdateName(string name)
    {
        ThrowIfNullOrWhiteSpace(name);
        Name = name;
    }

    private void UpdateSku(Sku sku)
    {
        Sku = sku;
    }

    public ErrorOr<Success> RemoveStock(int quantity)
    {
        ThrowIfNegativeOrZero(quantity);

        if (StockOnHand - quantity < 0)
            return ProductErrors.CantRemoveMoreStockThanExists;

        StockOnHand -= quantity;

        if (StockOnHand <= LowStockThreshold)
            AddDomainEvent(new LowStockEvent(this));

        return Result.Success;
    }

    public void AddStock(int quantity)
    {
        ThrowIfNegativeOrZero(quantity);
        StockOnHand += quantity;
    }
}
You'll notice that our Aggregate is neatly encapsulated - all data is private and we only allow modifications via public methods. Some methods fire Domain Events such as LowStockEvent that are used to update other Aggregates in the same Domain. Most methods have guard clauses to protect against basic invalid input. There is an assumption that all input validation has already been done at the Use Case level. For business validation, we use ErrorOr to gracefully return an error to the caller (e.g. ProductErrors.CantRemoveMoreStockThanExists).
Common (Shared Kernel)
While the goal of each module is to be as independent as possible, there will always be cross-cutting concerns and the need for shared code. That is where the Common.SharedKernel project comes into play.
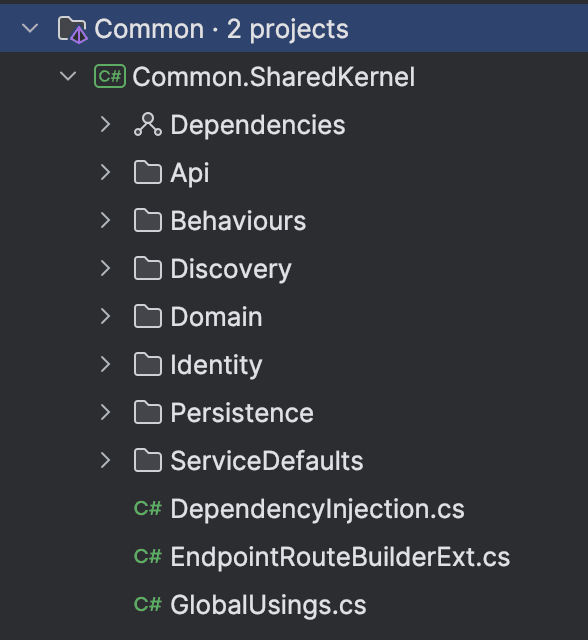
In my Modular Monolith I've found the need for the following common code:
- API: Extension to map between
ErrorOrerrors and HTTP status codes - Behaviors: MediatR behaviors for validation, logging, and global exception handling
- Discovery: Automatic registration of Minimal APIs
- Domain: Base classes, interfaces, and a small number of common entities
- Identity: Abstraction for identity management
- Persistence: EF Core interceptors, value converters, and common configuration
- ServiceDefaults: Aspire Service Defaults
NOTE: The more common code you have, the more you are coupling your modules. Some duplication is OK, and this library should be kept small.*
Conclusion
Implementing a Modular Monolith Architecture provides a unique balance between the simplicity of a monolithic application and the development scalability benefits of microservices. This approach allows us to maintain modular boundaries, encapsulate domain logic, and adopt the Request-Endpoint-Response (REPR) pattern effectively. With careful structuring, each module functions as a self-contained unit, fostering maintainability and reducing interdependencies. By focusing on clean boundaries, using Vertical Slice Architecture (VSA) where appropriate, and leveraging a Shared Kernel only for essential cross-cutting concerns, a Modular Monolith can achieve high cohesion and low coupling, leading to a more scalable and resilient application.
This deep dive illustrates how a Modular Monolith can serve as an ideal starting point for complex applications, with the flexibility to adapt to evolving business needs and scaling requirements.
In this post, we have seen the different parts of a Modular Monolith and how to implement them. There are a few implementation concerns that we haven't looked at that warrant their own blog post (e.g. Aspire, Testing, and Inter-Module Communication).