- Published on
Local Database Provisioning Made Simple with Docker, EF Core and Bogus
10 min read- Authors

- Name
- Daniel Mackay
- @daniel_mackay
- Introduction
- Working with SQL Server Locally
- Creating a Database and Updating the Schema
- Seed the Database with Test Data
- Seeding the Database with Static Data
- Aggregating the Steps into a Single Script
- Summary
- Resources
Introduction
As .NET Developers, managing databases via EF Core is a core task. There are several tasks that we need to perform while working on local databases:
- Ensure we have SQL Server installed and running
- Create a database
- Update the database schema
- Seed the database with test data
In this article I'm going to explore some ways to make this process easier and more repeatable. At the end I'll look at achieving all of this with a single command. 😄
Working with SQL Server Locally
For a long time, the default choice for .NET developers was to use SQL Server Express or SQL Server Development edition. These are free versions of SQL Server, but they can be difficult to configure. However, with the advent of Docker, it's now possible to run a full version of SQL Server in a container. This is a great way to ensure all developers have a consistent database experience.
One benefit I really like about using Dockerized Databases, is that the resources are only used when you need them. When you're not working on the project, you can stop the container and free up resources on your machine. This is especially useful if you're working on a laptop with limited resources.
The easiest way to do this is with docker-compose. Here's an example of a docker-compose.yml file that will run a SQL Server container:
services:
  db:
    environment:
      ACCEPT_EULA: "Y"
      SA_PASSWORD: "yourStrong(!)Password"
    # mssql server image isn't available for arm64 architecture, so we use azure-sql instead
    image: mcr.microsoft.com/azure-sql-edge:latest
    # If you really want to use MS SQL Server, uncomment the following line
    #image: mcr.microsoft.com/mssql/server
    ports:
      - 1500:1433
    restart: unless-stopped
    healthcheck:
      test: ["CMD-SHELL", "/opt/mssql-tools/bin/sqlcmd -S localhost -U sa -P yourStrong(!)Password -Q 'SELECT 1' || exit 1"]
      interval: 10s
      retries: 10
      start_period: 10s
      timeout: 3s
Once you have this file, you can run docker-compose up -d to start the container. This will give you a fresh Database server on-demand!
The restart: unless-stopped configuration, will restart our container between restarts of the host OS, but not if we manually stop it. I find this very handy.
You may also notice I'm using a non-standard host port of 1500. This is the port you'll use to connect to your SQL Server. If you have a local version of MS SQL Server already running (non-dockerized), it will most likely already be using port 1433. This means we can't use that same port for our container. I recommend using a different port for each project you work on so that you avoid these port conflicts. These errors can take a long time to resolve if you're not expecting them.
Creating a Database and Updating the Schema
Assuming you have a database with EF Core migrations already setup, this step is quite easy. You can run dotnet ef database update to apply the migrations to the database. This will create the database if it doesn't exist and apply any pending migrations.
Seed the Database with Test Data
One of the challenges of working with databases is seeding the database with test data. This is especially important when you're working on a new project and you want to see how the application behaves with a large dataset.
Bogus is an excellent library for generating test data. It's easy to use and has a lot of features. Here's an example from the SSW.CleanArchitecture template of how you can use Bogus to seed an entity in your database:
private async Task<List<Hero>> SeedHeroes()
{
    if (dbContext.Heroes.Any())
        return [];

    var faker = new Faker<Hero>()
        .CustomInstantiator(f =>
        {
            var name = f.PickRandom(_superHeroNames);
            var hero = Hero.Create(name, name.Substring(0, 2));
            var powers = f.PickRandom(_superPowers, f.Random.Number(1, 3))
                .Select(p => new Power(p, f.Random.Number(1, 10)));
            hero.UpdatePowers(powers);
            return hero;
        });

    var heroes = faker.Generate(NumHeroes);
    await dbContext.Heroes.AddRangeAsync(heroes);
    await dbContext.SaveChangesAsync();

    return heroes;
}
This function can be called from anywhere that has access to your DbContext.
One big advantage of generating test data in this way is that it makes it really easy to dial-up or dial-down the amount of data you're working with. This is especially useful when you're working on performance optimizations.
Improving Database Creating and Seeding with a Database project.
So far I've shown that, we have two steps needed to create and seed a database:
- CLI - Run
dotnet ef database updateto apply migrations - .NET Code - Seed our DB using Bogus
We need a way to execute the Bogus code above. We could hook this into our application startup, but that's not ideal. It slows down the start-up of our application everytime it runs and it opens up the risk of accidentally seeding the production database with test data. 😱
My preference is to create a separate console application to run the Bogus code. Once we have the console application it becomes a convenient way to also create our database and apply migrations.
I like to keep this application separate from the main source code to indicate it's not something that needs to be deployed to production.
This is exactly what we've done for the SSW.CleanArchitecture template:
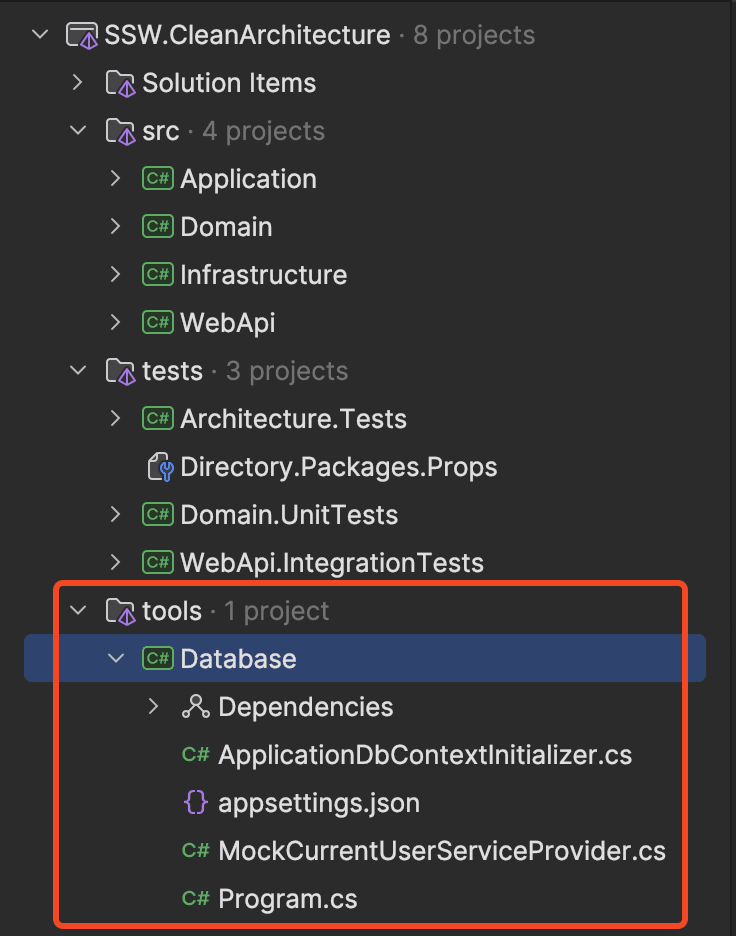
There are two main classes in this project:
ProgramApplicationDbContextInitializer
var builder = Host.CreateDefaultBuilder(args);

builder.ConfigureServices((context, services) =>
{
    services.AddSingleton(TimeProvider.System);
    services.AddScoped<ICurrentUserService, MockCurrentUserService>();
    services.AddScoped<EntitySaveChangesInterceptor>();

    services.AddDbContext<ApplicationDbContext>(options =>
    {
        options.UseSqlServer(context.Configuration.GetConnectionString("DefaultConnection"), opt =>
        {
            opt.MigrationsAssembly(typeof(DependencyInjection).Assembly.FullName);
        });

        options.AddInterceptors(services.BuildServiceProvider().GetRequiredService<EntitySaveChangesInterceptor>());
    });

    services.AddScoped<ApplicationDbContextInitializer>();
});

var app = builder.Build();
app.Start();

// Initialise and seed database
using var scope = app.Services.CreateScope();
var initializer = scope.ServiceProvider.GetRequiredService<ApplicationDbContextInitializer>();
await initializer.InitializeAsync();
await initializer.SeedAsync();
namespace SSW.CleanArchitecture.Database;

public class ApplicationDbContextInitializer(
    ILogger<ApplicationDbContextInitializer> logger,
    ApplicationDbContext dbContext)
{
    private readonly string[] _superHeroNames =
    [
        "Superman",
        "Batman",
        "Wonder Woman",
        "Flash",
        "Aquaman",
        "Cyborg",
        "Green Lantern",
        "Shazam",
        "Captain Marvel",
        "Cyclops",
        "Wolverine",
        "Storm"
    ];

    private readonly string[] _superPowers =
    [
        "Strength",
        "Flight",
        "Invulnerability",
        "Speed",
        "Heat Vision",
        "X-Ray Vision",
        "Hearing",
        "Healing Factor",
        "Agility",
        "Stamina",
        "Breath",
        "Weapons",
        "Intelligence"
    ];

    private readonly string[] _missionNames =
    [
        "Save the world",
        "Rescue the hostages",
        "Defeat the villain",
        "Stop the bomb",
        "Protect the city"
    ];

    private readonly string[] _teamNames =
    [
        "Marvel",
        "Avengers",
        "DC",
        "Justice League",
        "X-Men"
    ];

    private const int NumHeroes = 20;

    private const int NumTeams = 5;

    public async Task InitializeAsync()
    {
        try
        {
            if (dbContext.Database.IsSqlServer())
            {
                await dbContext.Database.MigrateAsync();
            }
        }
        catch (Exception e)
        {
            logger.LogError(e, "An error occurred while migrating or initializing the database");
            throw;
        }
    }

    public async Task SeedAsync()
    {
        try
        {
            var heroes = await SeedHeroes();
            await SeedTeams(heroes);
        }
        catch (Exception e)
        {
            logger.LogError(e, "An error occurred while seeding the database");
            throw;
        }
    }

    private async Task<List<Hero>> SeedHeroes()
    {
        if (dbContext.Heroes.Any())
            return [];

        var faker = new Faker<Hero>()
            .CustomInstantiator(f =>
            {
                var name = f.PickRandom(_superHeroNames);
                var hero = Hero.Create(name, name.Substring(0, 2));
                var powers = f.PickRandom(_superPowers, f.Random.Number(1, 3))
                    .Select(p => new Power(p, f.Random.Number(1, 10)));
                hero.UpdatePowers(powers);
                return hero;
            });

        var heroes = faker.Generate(NumHeroes);
        await dbContext.Heroes.AddRangeAsync(heroes);
        await dbContext.SaveChangesAsync();

        return heroes;
    }

    private async Task SeedTeams(List<Hero> heroes)
    {
        if (dbContext.Teams.Any())
            return;

        var faker = new Faker<Team>()
            .CustomInstantiator(f =>
            {
                var name = f.PickRandom(_teamNames);
                var team = Team.Create(name);
                var heroesToAdd = f.PickRandom(heroes, f.Random.Number(1, 3));

                foreach (var hero in heroesToAdd)
                    team.AddHero(hero);

                var sendOnMission = f.Lorem.Random.Bool();

                if (sendOnMission)
                {
                    var missionName = f.PickRandom(_missionNames);
                    team.ExecuteMission(missionName);
                }

                return team;
            });

        var teams = faker.Generate(NumTeams);
        await dbContext.Teams.AddRangeAsync(teams);
        await dbContext.SaveChangesAsync();
    }
}
You can find the full Database project here.
Seeding the Database with Static Data
There are generally two types of data we want to seed our database with:
- Test Data: This is demo data that may be useful on non-production environments.
- Static Data: This reference or lookup data that must exist in all environments for the system to function correctly.
I've already covered Test Data, but how can we manage Static Data? We can do this in EF Core via the use of HasData(). This can be used in your model configuration. The data will then be baked directly into migrations and applied to all environments.
public class Product
{
    public int Id { get; set; }
    public string Name { get; set; }
    public decimal Price { get; set; }
}
public class AppDbContext : DbContext
{
    public DbSet<Product> Products { get; set; }

    protected override void OnModelCreating(ModelBuilder modelBuilder)
    {
        base.OnModelCreating(modelBuilder);

        modelBuilder.Entity<Product>().HasData(
            new Product { Id = 1, Name = "Product A", Price = 9.99m },
            new Product { Id = 2, Name = "Product B", Price = 19.99m },
            new Product { Id = 3, Name = "Product C", Price = 29.99m }
        );
    }
}
public partial class InitialCreate : Migration
{
    protected override void Up(MigrationBuilder migrationBuilder)
    {
        // Insert initial data into the Products table
        migrationBuilder.InsertData(
            table: "Products",
            columns: new[] { "Id", "Name", "Price" },
            values: new object[,]
            {
                { 1, "Product A", 9.99m },
                { 2, "Product B", 19.99m },
                { 3, "Product C", 29.99m }
            });
    }
}
Aggregating the Steps into a Single Script
So far we've got all the pieces we need to fully provision our local development database. However, we're missing a way to tie all these steps together. This is where an up.ps1 script comes in.
up.ps1 is a concept I was introduced to me by two of my colleagues - William Liebenberg and Gordon Beeming. The idea is to have a single script that you can run to bring up all resources needed for your development environment. This script should be idempotent, meaning you can run it multiple times and it will always bring your environment to the same state.
In our example, we're only bring up a database, but we could also be bringing up other resources such as a Redis Cache, or RabbitMQ.
Here's an example of what an up.ps1 script might look like:
Param(
    [switch]$skipDeploy = $false
)

Write-Host "🚢 Starting Docker Compose" -ForegroundColor Green
docker compose up -d

if (-not $skipDeploy) {
    $upScriptPath = $Script:MyInvocation.MyCommand.Path | Split-Path

    Write-Host "🚀 Creating and Seeding Database" -ForegroundColor Green
    Set-Location ./tools/Database/
    dotnet run

    Set-Location $upScriptPath
}
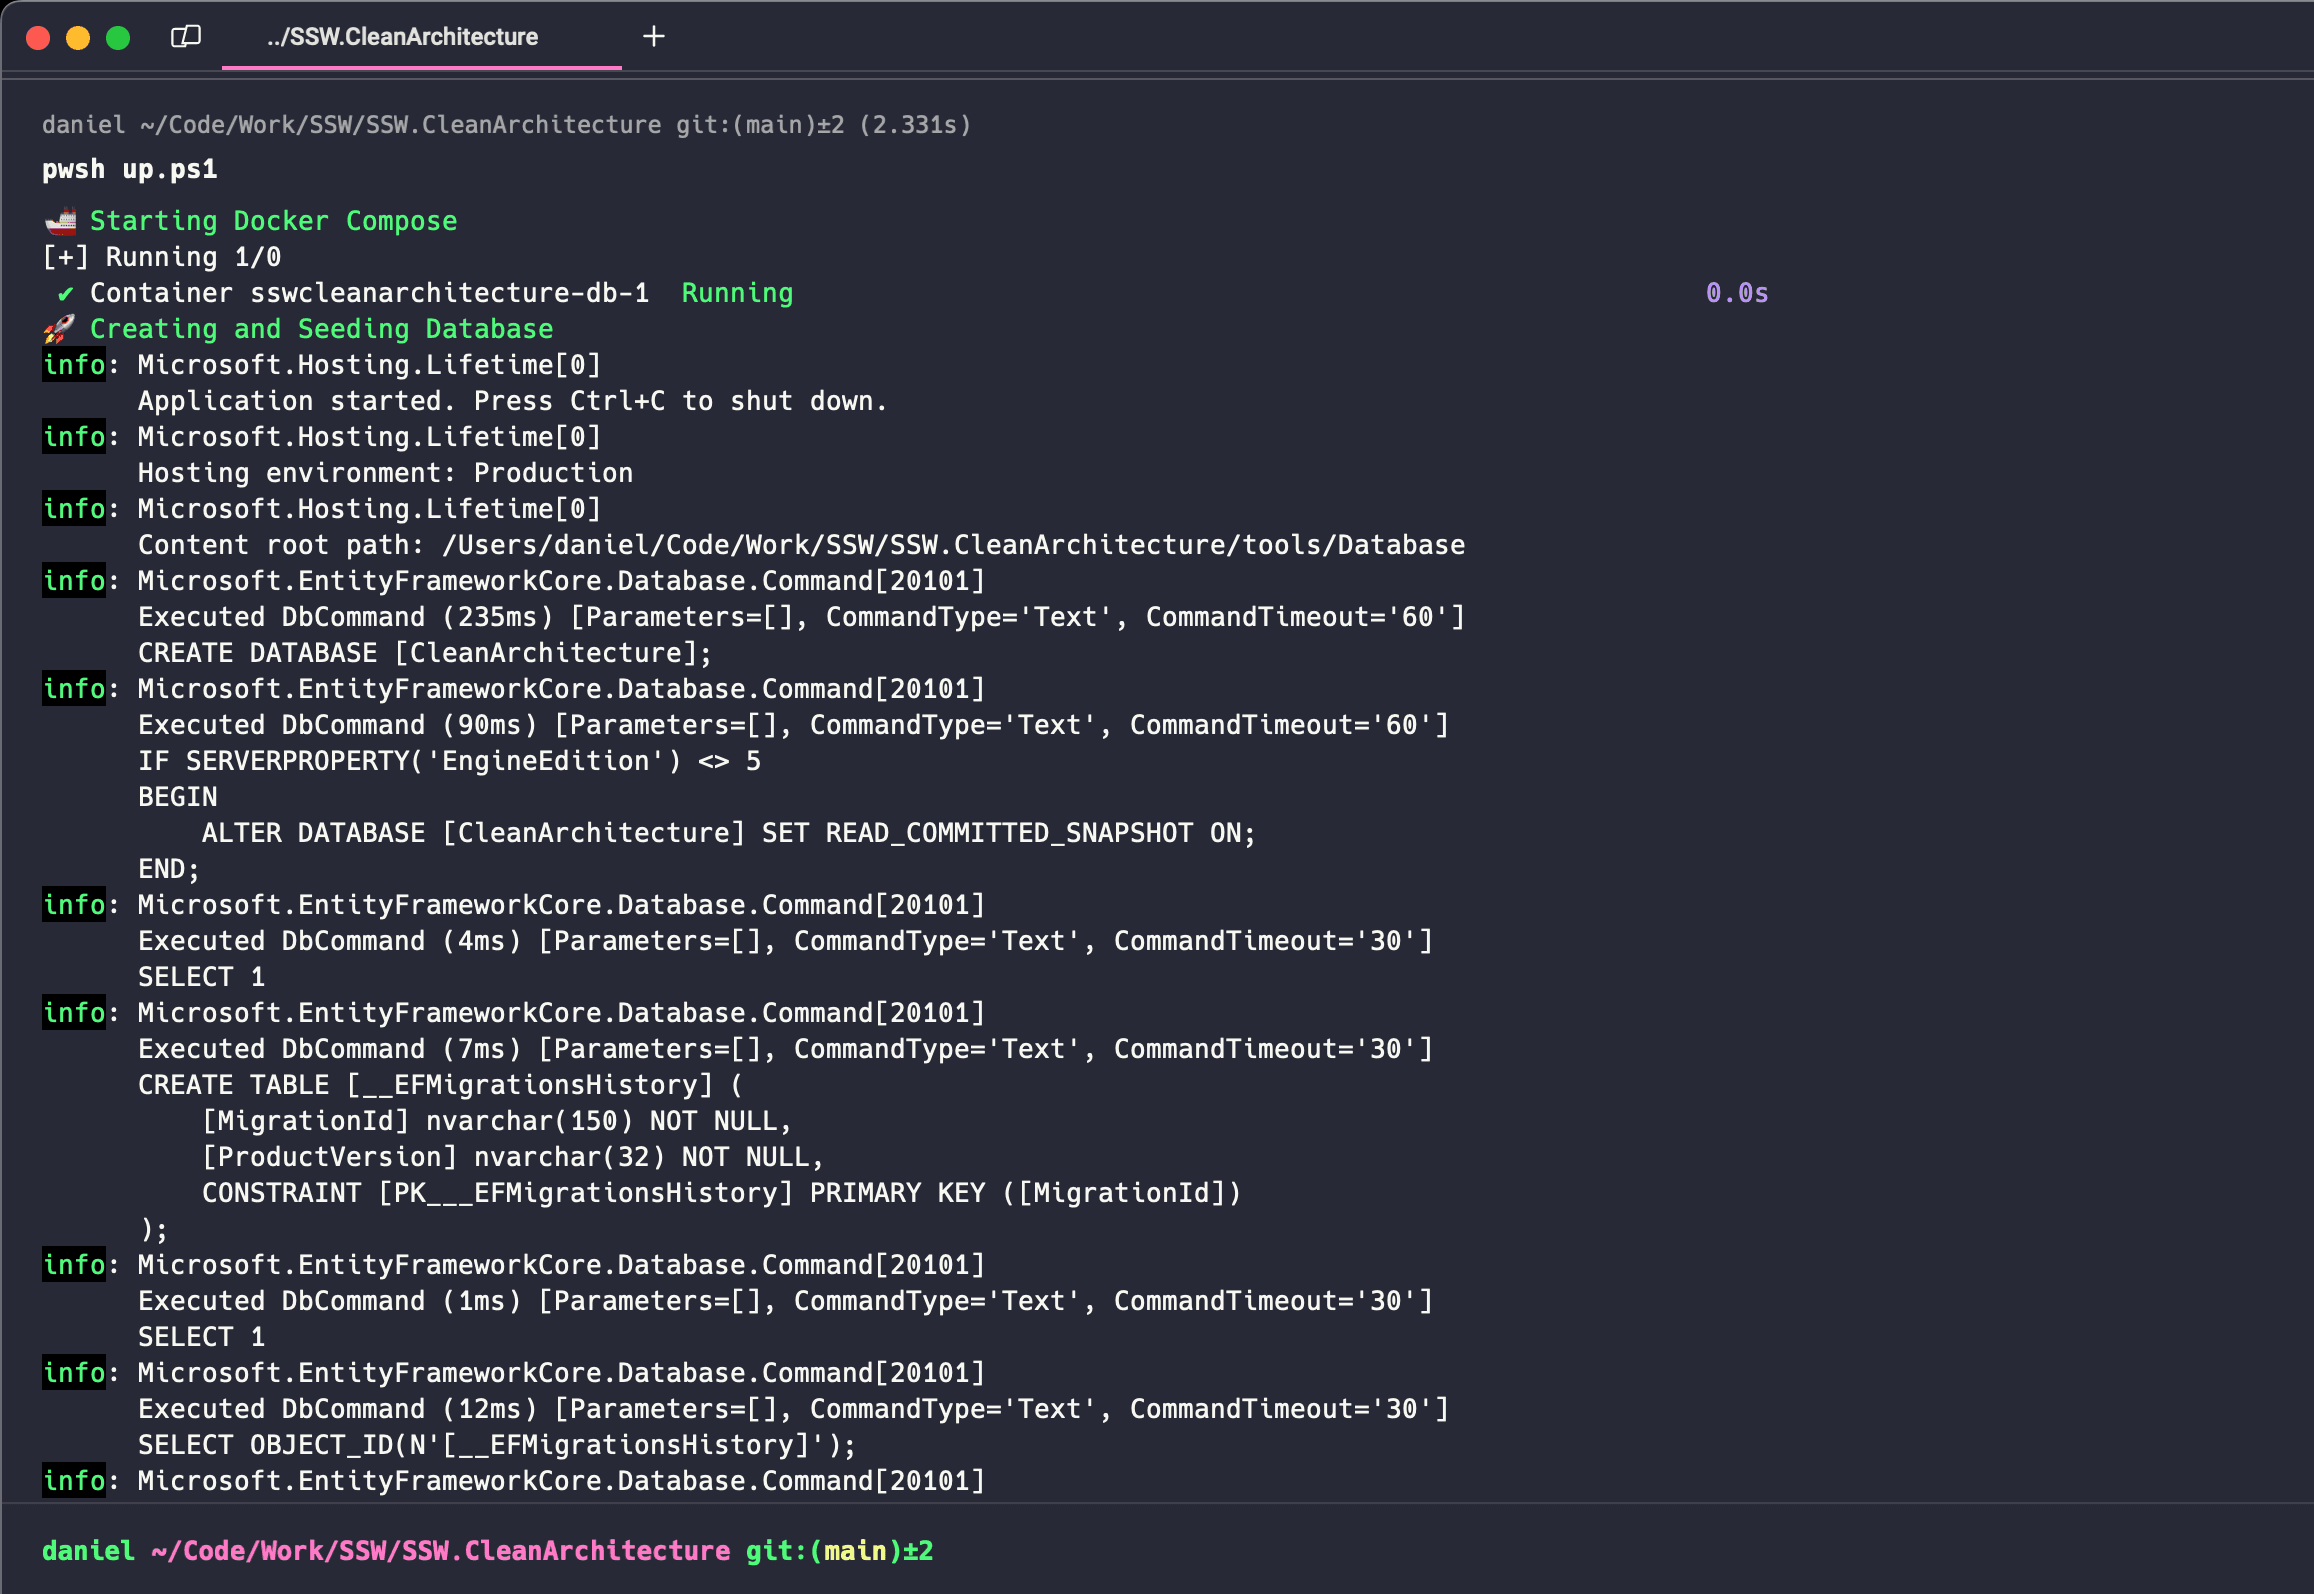
This script can be run from the command line via:
- Windows:
.\up.ps1. - MacOS:
pwsh ./up.ps1.
For example:
Summary
In this blog post I've explored how we can simplify database management for .NET developers. I highlighted key steps such as using Docker to run SQL Server containers, which provided a consistent and resource-efficient database environment. I also discussed applying EF Core migrations to create and update databases and using the Bogus library for generating test data.
To streamline these tasks, I recommended creating a separate console application for seeding databases, helping us avoid the risk of contaminating production environments. I further simplified the process by using an up.ps1 PowerShell script to automate the setup, making database provisioning efficient and repeatable with a single command.
I hope this article has been helpful in improving your EF Core developer experience. If you have any questions, feedback, or better alternatives, please share them in the comments below.